1. Introduction
1.1. Purpose and Target Audience of this Document
This document is intended for administrators who wish to install the UNICORE servers at their site in a multi-user production environment for operation with a resource management (batch) system such as Torque, Slurm, etc.
This document is NOT suitable if you just want to get a simple running system for testing quickly,
in that case you should simply follow the instructions in the README.txt or download
and use the graphical installer unicore-servers-7.3.0.jar
This document covers the installation and configuration of the UNICORE
server components on UNIX/Linux server systems. It is assumed that
the unicore-servers-7.3.0.tgz and optionally the unicore-workflow-7.0.0.tgz
packages have been downloaded, and that Java version 7 or 8 is installed on those systems
where the UNICORE components will run. We assume that a single firewall exists
that protects all the servers within the site.
In this document, not every detail and configuration option of UNICORE can be explored. If the scenarios covered here do not match your needs, please have a look into the other reference manuals on https://www.unicore.eu/documentation/
More background information can be found at the UNICORE website (http://www.unicore.eu).
1.2. Overview of the UNICORE Servers and some Terminology
This section contains a very brief overview of the server components in a UNICORE Grid to give you an idea of the purpose of each component and how they interact.
In the following, a "site" is an administrative domain, protected by a firewall. A "Grid" is a collection of sites that can be accessed in a common way.
The Gateway is the main entrance to the site, through which the components can be reached from outside the site’s firewall. All client connections are with the gateway, which will then forward the requests and send the replies back to the client. Client is used here in the broad sense, since also services can act as clients, for example when transferring a file between sites. The Gateway performs initial user authentication, and will reject requests that do not originate from a trusted client. The gateway port is the only port which needs to be open for https connections from the network outside the firewall, and you will have to configure your firewall accordingly.
The UNICORE/X server is the central component in a UNICORE Grid. It hosts services such as job submission and management, storage access, file transfer and others. The UNICORE/X server accepts jobs, submits them to the local systems via the TSI, allows to upload and download data via several protocols, and thus provides most of the functionality of UNICORE. UNICORE/X handles user authorisation, using (configurable) security policies that take the current user, the requested action and a set of user attributes into account. It also requires one or more "attribute sources", for example an XUUDB, which are queried for user attributes. At minimum, one UNICORE/X per target resource is required. It should be tuned to the performance requirements, and in general needs ample memory, CPU power and local disk space (for persistent data and log files).
The XUUDB is one common option that can be used as an attribute source for UNICORE/X. For each Grid user, it provides local attributes like Unix login, the role (e.g. "user" or "admin"). Since the XUUDB is a web service, it can be used from multiple UNICORE/X servers within a site. Other attribute sources exist, from a simple map file to an identity management server (Unity, www.unity-idm.eu) that can even be used accross sites. Attribute sources may also be combined.
The Perl TSI component (often briefly referred to as TSI) interfaces with the local systems (batch scheduler, file systems), thus it must be installed on the target resource. In case of a cluster, this will be one of the frontend (or login) nodes. It is a mandatory component in a multi-user setting and it is the only component that runs as "root". One TSI per target resource is required.
The Registry is very much like a UNICORE/X server, however it runs only a single service (the "shared registry" service), which allows clients to discover available services hosted by multiple UNICORE/X servers. The Registry does not need as much memory and processing power as the UNICORE/X server. In typical UNICORE Grids there is at least one shared Registry. For redundancy in large Grids, more than one Registry may be deployed.
The components mentioned (Gateway, UNICORE/X, XUUDB, TSI, Registry) are denoted as "core" services, and can be downloaded together in the "core server" package mentioned above.
The UNICORE workflow system introduces two more components, which again are based on UNICORE/X, but host other types of services. We will introduce them later in the workflow section.
All UNICORE servers are implemented in Java, except the Perl TSI. Thus Java version 7 or higher is required to run the UNICORE servers.
1.3. Overview of this Document
There are different ways for setting up a UNICORE installation. Depending on the number of servers you have and the type of resource you wish to access (e.g. a multinode cluster or just a single server) the optimal setup can vary.
To be concrete, we cover the following common scenarios:
-
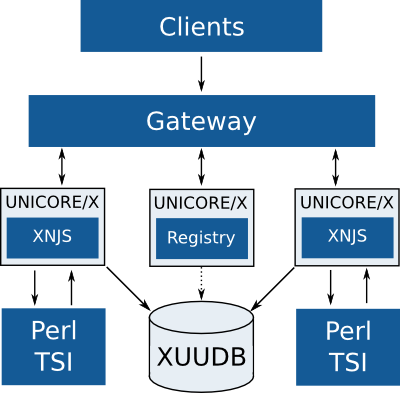
Single UNICORE Site for accessing a multi-node cluster. This consists of one Gateway, UNICORE/X, XUUDB, and Registry installed on two servers, with the Perl TSI installed on the cluster frontend. This setup can be seen as a foundation for further extensions, since it already includes a Registry, which is useful in those cases where more than a single UNICORE resource shall be available to clients.
-
Adding another UNICORE/X server, e.g. for accessing another cluster, to an existing installation
-
Multi-site UNICORE installations crossing administrative domains
-
Setting up the UNICORE workflow system
-
Variations of the above scenarios
2. Installation of Core Services for a Single Site
This section covers the installation of services at one UNICORE site.
2.1. Basic Scenarios
The basic layout of a UNICORE site is depicted in [img-basic-layout]. Each component (Gateway, UNICORE/X, Registry, Perl TSI, XUUDB) has an associated hostname and port setting.
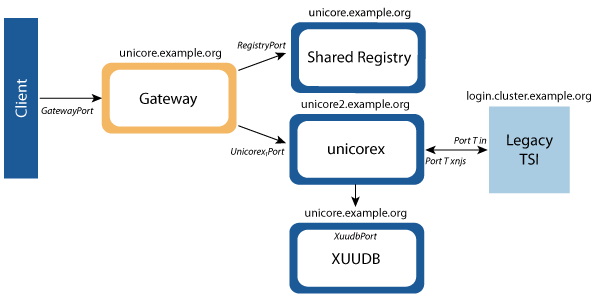
Of course all components can be installed on a single machine, but in general you should distribute the components. Even in this simple case, several deployment options exist. To choose the right one, consider the following:
The Gateway port is the only one which needs to be open for https connections from the network outside the firewall. It needs to be able to accept and initiate connections from/to the UNICORE/X and Registry servers.
The UNICORE/X component requires most of the processing power, and memory, and is thus best installed on its own machine.
The Perl TSI component communicates with the local systems (batch scheduler or file systems), thus it must be installed on the target resource. In case of a cluster, this will be one of the login nodes.
In the following two layout options are given for the case where there are two server machines available:
-
Option "load distributed" This option allows to provide more processing power to the UNICORE/X server.
-
Machine 1: Gateway, XUUDB, Registry
-
Machine 2: UNICORE/X
-
-
Option "security focussed" In a more security oriented environment, the Gateway would run on a separate server, residing in a demilitarised network zone (DMZ), and the other components would run in the intranet. In [img-basic-layout] this option is visualised by the different background colours of the services.
-
Machine 1: Gateway
-
Machine 2: XUUDB, Registry, UNICORE/X
-
In any case, you should make a deployment plan, i.e. decide how you wish to distribute the components, and note all the hostnames and ports. The following table provides a template for this deployment plan:
|
|
|
|
|
Gateway |
|
|
||
UNICORE/X |
|
|||
UNICORE/X |
|
|||
UNICORE/X |
|
|
||
Registry |
|
|||
Registry |
|
|
||
XUUDB |
|
|
||
TSI |
|
|
2.2. Preparation
For security reasons, you should create a dedicated user (say, unicore) who will run the server components (Gateway, XUUDB, UNICORE/X, Registry). In a multi-user setting, the Perl TSI component needs to run as root.
|
Note
|
For testing, you can run the Perl TSI as a non-privileged user. All requests will then be executed under that user. |
The core server components gateway, unicorex, registry, xuudb, and tsi are available in the bundle
unicore-servers-7.3.0.tgz at
https://sourceforge.net/projects/unicore/files/1%20UNICORE%206%20Servers%20and%20Services/1.1%20Core%20Server/7.3.0/ .
If you haven’t already done so, download the .tgz file, and untar it into a
directory such as /opt/unicore.
You have several options to configure and install the components.
-
(recommended) You may use the
configure.propertiesfile and set up the local configuration parameters there before you run theconfigure.pyscript, which is available on top-level of theunicore-servers-7.3.0.tgz. -
You may go through the configuration files and adapt them to your local setup, e.g. hostnames and ports, local paths etc. which should be straight forward. Specific configuration options are covered in the next chapters.
We definitely prefer the first approach, since it will give you a working configuration, which you then can customise later.
So here is the recommended procedure
-
Edit the
configure.propertiesfile, and customize it according to your deployment plan; it includes the security configuration (keystores, truststores) for the components -
Configure and install Gateway, XUUDB, Registry, and UNICORE/X using
configure.pyandinstall.py -
Install the correct Perl TSI for your batch system and configure UNICORE/X for the chosen TSI and local systems
-
Start the servers
2.3. Installation
Here is a full example. It assumes we have two servers,
unicore.example.org and unicore2.example.org,
and the TSI will be installed on login.cluster.example.org.
We’ll choose the Torque TSI (linux_torque).
We’ll put UNICORE/X on unicore2 and Gateway, Registry and XUUDB on
unicore.example.org, corresponding to "option 1" above.
The UNICORE/X server will be named CLUSTER and the Registry will be named REGISTRY.
|
Note
|
We will also enable the StorageFactory service, which allows clients to create directories in a base directory on the cluster filesystem, and use them at their discretion. This is very useful if later the Workflow services are added. |
You should copy and untar the unicore-servers-7.3.0.tgz on both servers and on the cluster
login node, say into /opt/unicore/unicore-servers-7.3.0
After untarring, you’ll have the following basic layout
unicore-servers-7.3.0
- gateway
   * bin
   * conf
   * lib
   * logs
- registry
   * bin
   * ...
- unicorex
   * bin
   * ...
- xuudb
   * bin
   * ...
- tsi
   * bin
   * ...
- configure.properties
- configure.py
- extras
- install.py
- certs
- docs
- README
- CHANGES
- start.sh
- stop.sh
Now you should edit the configure.properties file and enter all the hostnames
and ports that you have decided on.
#
# Configuration properties
#
# this file is read by the configure.py script.
#
# Note:: the special parameter value "hostname" will be replaced
# by the hostname specified on the command line or
# found by lookup.
#

[parameters]

#
# target base directory, use "currentdir" to leave as-is
# (otherwise use an absolute path, such as "/opt/unicore")
#
INSTALL_PATH=currentdir


# which components to configure

#
# the Gateway
#
gateway=true

#
# the UNICORE/X server
#
unicorex=true

#
# the Perl TSI (check also the xnjsConfigFile property below)
#
tsi=true

#
# the shared registry server
# (if you want UNICORE/X to use this or another external registry,
#  make sure to edit the relevant settings below)
#
registry=true

#
# the XUUDB user database
#
xuudb=true

#
# shall the demo user cert be added to the xuudb and the map file?
#
installdemouser=false

#
# shall the docs be copied by install.py?
#
docs=true

#
# Java command to use
#
JAVA_CMD=java


#
# Gateway host and port
#
gwHost=unicore.example.org
gwPort=8080

#
# enable auto-registration of the UNICORE/X server with the gateway?
#
gwAutoRegistration=false

#
# add a line to connection.properties for the registry
# defaults to the value of the "registry" parameter
#
gwAddRegistryEntry=${registry}

#
# Security settings
#

# keystore is a JKS or PKCS12 file
gwKeystore=conf/gateway.p12
gwKeystorePassword=<keystore password>

# truststore is either a JKS, PKCS12 or .pem file,
# or a directory containing .pem files
gwTruststore=conf/truststore.jks
gwTruststorePassword=<truststore password>


#
# UNICORE/X server host and port
#
uxHost=unicore2.example.org
uxPort=7777
# Port used to connect to the UNICORE/X server via JMX
# (leave empty to disable JMX)
uxJmxPort=9128

#
# VSite name
#
uxName=CLUSTER

#
# Security settings
#
# keystore is a JKS or PKCS12 file
uxKeystore=${INSTALL_PATH}/unicorex/conf/unicorex.p12
uxKeystorePassword=<keystore password>

# truststore is either a JKS, PKCS12 or .pem file,
# or a directory containing .pem files
uxTruststore=${INSTALL_PATH}/unicorex/conf/truststore.jks
uxTruststorePassword=<truststore password>

#
# Gateway host/port. By default these are in sync with the
# gateway server settings defined above
#
uxGatewayHost=${gwHost}
uxGatewayPort=${gwPort}

#
# XNJS configuration file
#
# xnjs.xml         : uses the embedded Java TSI
# xnjs_legacy.xml  : uses the Perl TSI
#
uxXnjsConfigFile=xnjs_legacy.xml

#
# settings for defining the external registry
#

# register with an external Registry?
uxUseExternalRegistry=true

#
# Give the URL of the Registry the UNICORE/X should register
# with (defaults to the one we are installing)
uxUrlExternalRegistry=https://${gwHost}:${gwPort}/${registryName}/services/Registry?res=default_registry


#
# Enable the StorageFactory service for this UNICORE/X server?
# A StorageFactory should ideally be running on sites with a powerful,
# high capacity filesystem
#
uxEnableStorageFactory=true

#
# For the default storage factory, where on the cluster file system should the files be created
# This has to be world executable (like the filespace directory, see below comment on uxTSIWorkingDirectoriesBaseDir)
#
uxDefaultStorageFactoryPath=${INSTALL_PATH}${FILE_SEPARATOR}unicorex${FILE_SEPARATOR}storage-factory

#
# Enable the OGSA BES interface
# (leave empty to disable BES)
#
uxEnableBES=de.fzj.unicore.bes.util.BESOnStartup

# whether to use the XUUDB
# - if set to "XUUDB", the XUUDB will used
# - if set to "FILE", a map file 'conf/simpleuudb' will be used
uxUseXUUDB=XUUDB

# host/port, by default the XUUDB server values given below are used
uxXUUDBHost=${xuudbHost}
uxXUUDBPort=${xuudbPort}

#
# UNICORE/X GCID: the ID used by the UNICORE/X server for querying the XUUDB
#
uxGCID=CLUSTER

#
# Settings for interfacing UNICORE/X to the Perl TSI
# By default, these are in sync with the corresponding TSI properties
# defined below

# The TSI base directory
uxTSIDirectory=${tsiInstallDirectory}

uxTSIHost=login.cluster.example.org
uxTSIPort=4433

# The port on which the XNJS is listening for TSI worker connections
uxTSICallbackPort=7654

# The user id for querying job info from the batch system (cannot be root!)
uxTSIQstatUser=unicore

# The interval between batch system status checks (in milliseconds)
uxTSIStatusUpdateInterval=60000

#
# The directory on the target system where the job directories will be created
# (On a cluster, this should be a shared filesystem!)
# The directory must be writable for every user id but users are only allowed to manipulate the data / directories they've created
# I.e. root should execute a 'chmod 1777' on this directory
#
uxTSIWorkingDirectoriesBasedir=${INSTALL_PATH}/FILESPACE

#
# Resource settings, these will go into the IDB file at
# 'unicorex/conf/simpleidb'.
# All resource settings have a minimum, a maximum and a default value.
# Please consult the IDB documentation (docs/unicorex/xnjs-idb.txt)
# for further details and options
#

# total CPUs
uxTotalCPUsMin=1
uxTotalCPUsMax=1
uxTotalCPUsDefault=1

# nodes
uxNodesMin=1
uxNodesMax=1
uxNodesDefault=1

# CPUs per node
uxCPUsPerNodeMin=1
uxCPUsPerNodeMax=1
uxCPUsPerNodeDefault=1

# wall clock time (seconds) for the job
uxTimeMin=10
uxTimeMax=86000
uxTimeDefault=3600

# memory per node (in bytes)
uxMemoryPerNodeMin=1048576
uxMemoryPerNodeMax=1073741824
uxMemoryPerNodeDefault=268435456

# Settings related to the Perl TSI server
# The settings have to be consistent with the settings of the corresponding UNICORE/X, e.g. uxTSIHost
#
# TSI host and port
# (i.e. port on which the TSI process will listen for XNJS requests)
tsiHost=login.cluster.example.org
tsiPort=4433

# The port on which the XNJS is listening for TSI worker connections
tsiNjsPort=7654

#
# The selected TSI (i.e. directory containing platform-specific
# TSI files), one of
#
# tsi/linux_torque       (Torque)
# tsi/linux_slurm        (Slurm)
# tsi/linux_lsf          (LSF)
# tsi/aix_ll             (LoadLeveler)
# tsi/sun_gridengine     (GridEngine)
# tsi/NOBATCH            (Simple fork)
#
# (Note: there are several more like Condor which are less
# often used and may be less well supported)
#
tsiSelected=tsi/linux_torque

#
# Where to install the Perl TSI
# (absolute path)
#
tsiInstallDirectory=${INSTALL_PATH}/tsi-torque


#
# Common information provider (CIP) settings
# This data is used to provide information about this site to
# the Common Information Service (CIS)
#
cipLatitude=52.0
cipLongitude=4.888573
cipCPUClockSpeed=3000
cipTotalCapacity=204800


#
# XUUDB server host and port
#
xuudbHost=unicore.example.org
xuudbPort=34463

#
# Security settings
#

# keystore is a JKS or PKCS12 file
xuudbKeystore=conf/xuudb.p12
xuudbKeystorePassword=<keystore-password>
xuudbKeystoreType=pkcs12

# truststore is a JKS or PKCS12 file
xuudbTruststore=conf/truststore.jks
xuudbTruststorePassword=<truststore-password>
xuudbTruststoreType=jks

# ACL entry: to use the XUUDB admin.sh client, its certificate DN
#            needs to be in the xuudb.acl file
#            (see docs/xuudb/xuudb.txt for full information)
xuudbAdminDN=<DN of your xuudb admin's certificate>


#
# Shared registry UNICORE/X server host and port
#
registryHost=unicore.example.org
registryPort=7778
# Port used to connect to the UNICORE/X server via JMX
# (leave empty to disable JMX)
registryJmxPort=9129

#
# VSite name
#
registryName=REGISTRY

#
# registry GCID: the ID used by the registry UNICORE/X server for querying the XUUDB
# this is only relevant if access control on the registry is using an XUUDB - by default
# access control is done using the file registry/conf/simpleuudb
# (see also the registry/conf/uas.config file)
#
registryGCID=REGISTRY
Copy your configure.properties somewhere safe, e.g. to your home
directory, for later use and reference.
Now you’re ready to configure the components. In our example scenario, this would be as follows
ssh unicore@unicore.example.org
cd /opt/unicore/unicore-servers-7.3.0
cp ~/configure.properties .
./configure.py [installation userid] [hostname]
and the same for unicore2.example.org and the cluster login node.
This will insert your configuration values into the relevant files. Your components are now ready to run.
2.4. Security Settings
This section addresses the security setup of UNICORE server components. In configure.properties
you already have specified keystores and truststores. Here some details are given.
Public Key Infrastructure (PKI) is used for setting up SSL connections between the
components. Each component has its own credentials (private and public key of
an x509 certificate), signed by a trusted Certificate Authority.
Furthermore the Gateway and UNICORE/X servers need to be able to ascertain the validity of user certificates, for which they require a truststore containing all relevant CA certificates. The Registry and XUUDB need to trust only the CA that issued the Gateway and UNICORE/X certificates.
All server components support the PKCS12 and JKS (Java Key Store) keystore formats. PKCS12 is commonly used for holding the credentials (private keys) whereas JKS can be used for both holding the private keys and also the trusted certificates. Holding only trusted certificates makes the truststore (a keystore with only trusted certificates entries) exchangeable between the server components. It is good practice to use two distinct keystores for each server component: One for the server’s credential (PKCS12 or JKS) and one for the truststore (JKS). Tools for creating a truststore from certificates (pem files) are e.g. keytool from the Java runtime and Portecle.
2.4.1. Gateway
The configuration for key- and truststore is done in gateway/conf/security.properties
The truststore must contain every CA certificate signing user certificates of those
who are allowed to access the site.
The gateway also has to trust connections from the other services. Thus the CA
certificate signing the services' certificates must also be added to the truststore.
   #
   # gateway credential
   #
   gateway.credential.path=/path/to/your/gateway/keystore.p12
gateway.credential.password=<keystore password> #
# truststore containing the trusted certificates
#
gateway.truststore.type=keystore
gateway.truststore.keystorePath=/path/to/your/gateway/truststore.jks
gateway.truststore.keystorePassword=<truststore password>The gateway supports the truststore type "directory", where all pem files in a given directory are trusted. This is configured as follows
   gateway.truststore.type=directory
   gateway.truststore.directoryLocations.1=/.../*.pem
   gateway.truststore.keystorePassword=unused
2.4.2. UNICORE/X and Registry
The configuration for key- and truststore is done in unicorex/conf/wsrflite.xml (registry/conf/wsrflite.xml).
UNICORE/X has to trust connections from the Gateway, and needs to be able to validate
user certificates. Thus you have to add all the relevant CA certificates to the truststore.
   <!-- SSL -->
   <property name="container.security.sslEnabled" value="true"/>
   <property name="container.httpServer.requireClientAuthn" value="true"/>
Set both values to "true".
   <!-- UNICORE/X server identity -->
   <property name="container.security.credential.path"
             value="/path/to/your/unicorex/keystore.p12"/>
<property name="container.security.credential.password" value="<keystore password>"/> <!-- UNICORE/X truststore -->
<property name="container.security.truststore.keystorePath"
value="/path/to/your/unicorex/truststore.jks"/>
<property name="container.security.truststore.keystorePassword" value="truststore password"/>
<property name="container.security.truststore.type" value="keystore"/>
<property name="container.security.truststore.keystoreFormat" value="jks"/>The gateway supports the truststore type "directory", where all pem files in a given directory are trusted. This is configured as follows
   <!-- UNICORE/X truststore -->
   <property name="unicore.wsrflite.ssl.truststore"
             value="/etc/unicore/trusted-certs"/>
   <property name="container.security.truststore.keystorePassword" value="unused"/>
   <property name="container.security.truststore.type" value="directory"/>
2.4.3. xuudb
The configuration for key- and truststore is done in xuudb/conf/xuudb_server.conf.
The XUUDB needs to trust the UNICORE/X server(s) and
the administrator. Usually the administrator uses the XUUDB certificate (to be configured in xuudb/conf/xuudb_client.conf).
xuudb.client.sslEnabled=true xuudb.credential.path=/path/yo/your/xuudb/keystore.p12
xuudb.credential.format=pkcs12
xuudb.credential.password=<keystore password> xuudb.truststore.keystorePath=/path/to/your/xuudb/truststore.jks
xuudb.truststore.type=keystore
xuudb.truststore.keystoreFormat=jks
xuudb.truststore.keystorePassword=<truststore password>The access control list has to contain the DNs (distinguished names) of the xuudb administrators.
This is in particular the DN of the credentials (.p12 file) defined in xuudb/conf/xuudb_client.conf,
to enable the administrator logged on to the system unicore.example.org to list or manipulate
the xuudb data base.
#
# example XUUDB ACL file
#
CN=uudbadmin,OU=example lt,O=some ca,C=eu
2.5. Installation of the Perl TSI and TSI-related Configuration of the UNICORE/X server
During the previous installation step, the files were copied to the target system, in our example
to login.cluster.example.org, into the directory /opt/unicore/unicore-7.3.0/tsi-torque.
You can repeat this step if necessary (for example for choosing a different batch system), by doing
cd /opt/unicore/unicore-7.3.0/tsi
./Install.sh|
Note
|
Several TSI implementations are available in the sub-directory ./tsi. The specific TSIs with batch sub-system
are composed of all common files from ./tsi/SHARED plus the files for the specific operation system and/or
batch sub-system, e.g. ./tsi/linux_torque. The required files together with config files and start/stop scripts are
copied into a new directory by the Install.sh script |
Please review the <tsi_installation_directory>/perl/tsi file.
Hostnames and ports have already been set by the configure.py step, but it might be necessary to
adapt the path settings, and the location of the batch system commands (qsub etc).
Also review the basic configuration of the TSI conf/tsi.properties file where host name and ports are set as well
as the logging directory.
When you are done you should execute (as root)
+./Install_permissions.sh <tsi_installation_directory>+to set restricted file permissions for the TSI files and directory.
In our example, the tsi_installation_directory is /opt/unicore/unicore-7.3.0/tsi-torque.
The TSI uses the auxiliary script tsi_ls to list files and tsi_df to report the free disk space on a file system.
Make sure that both scripts are world readable because they
have to be read from any user id when executing a ListDirectory request.
The unicorex configuration (unicorex/conf/xnjs_legacy.xml) needs to be changed so that the tsi_ls and tsi_df
files in your TSI installation can be found:
<property name="CLASSICTSI.TSI_LS" value="/my_full_tsi_path/perl/tsi_ls"/>
<property name="CLASSICTSI.TSI_DF" value="/my_full_tsi_path/perl/tsi_df"/>Here available resources, applications, and environments on the target system have to be specified to make them available to the user’s client. More detailed information is provided in the IDB documentation.
All of the predefined specifications are optional, so you can either adapt the values to match your system or delete the specification.
simpleidb<jsdl:Exact>
<!-- Resources -->
<idb:TargetSystemProperties>
<jsdl:Resources xmlns:jsdl="http://schemas.ggf.org/jsdl/2005/11/jsdl">
<!-- CPU architecture, must be one of x86, x86_64, ia64, powerpc, sparc or other -->
<jsdl:CPUArchitecture>
<jsdl:CPUArchitectureName>x86_64</jsdl:CPUArchitectureName>
</jsdl:CPUArchitecture>
<!-- Operating system, must be one of those defined by JSDL, e.g. LINUX, MACOS, WINNT, AIX, -->
<jsdl:OperatingSystem>
<jsdl:OperatingSystemType>
<jsdl:OperatingSystemName>LINUX</jsdl:OperatingSystemName>
</jsdl:OperatingSystemType>
<jsdl:OperatingSystemVersion>14.04.2</jsdl:OperatingSystemVersion>
<jsdl:Description>Ubuntu GNU/Linux LTS</jsdl:Description>
</jsdl:OperatingSystem>
<!-- cpu time (per cpu) in seconds -->
<jsdl:IndividualCPUTime>
<jsdl:Exact>3600</jsdl:Exact>
<!-- Exact denotes the default value -->
<jsdl:Range>
<jsdl:LowerBound>1</jsdl:LowerBound>
<jsdl:UpperBound>86400</jsdl:UpperBound>
</jsdl:Range>
</jsdl:IndividualCPUTime>
<!-- Nodes -->
<jsdl:TotalResourceCount>
<jsdl:Exact>1.0</jsdl:Exact>
<!-- Exact denotes the default value -->
<jsdl:Range>
<jsdl:LowerBound>1.0</jsdl:LowerBound>
<jsdl:UpperBound>1.0</jsdl:UpperBound>
</jsdl:Range>
</jsdl:TotalResourceCount>
</jsdl:Resources>
<!-- CPUs per node -->
<jsdl:IndividualCPUCount>
<jsdl:Exact>1.0</jsdl:Exact>
<!-- Exact denotes the default value -->
<jsdl:Range>
<jsdl:LowerBound>1.0</jsdl:LowerBound>
<jsdl:UpperBound>1.0</jsdl:UpperBound>
</jsdl:Range>
</jsdl:IndividualCPUCount>
<!-- either Nodes together with CPUs per node have to be specified or total CPUs, not all of them -->
<!-- total CPUs -->
<jsdl:TotalCPUCount>
<jsdl:Exact>1.0</jsdl:Exact>
<!-- Exact denotes the default value -->
<jsdl:Range>
<jsdl:LowerBound>1.0</jsdl:LowerBound>
<jsdl:UpperBound>1.0</jsdl:UpperBound>
</jsdl:Range>
</jsdl:TotalCPUCount>
<!-- Memory per node (bytes) -->
<jsdl:IndividualPhysicalMemory>
<jsdl:Exact>268435456</jsdl:Exact>
<!-- Exact denotes the default value -->
<jsdl:Range>
<jsdl:LowerBound>1048576</jsdl:LowerBound>
<jsdl:UpperBound>1073741824</jsdl:UpperBound>
</jsdl:Range>
</jsdl:IndividualPhysicalMemory>2.6. The Connections Between the UNICORE Components
This section shows in detail which configuration file entries control the connections between components, and where hostnames and ports can be set for each component.
By default a UNICORE site would consist of the Gateway, a UNICORE/X server, a Registry, the Perl TSI, and the XUUDB. For defining a virtual site (vsite, includes the components needed to access a target system through UNICORE) named CLUSTER, its host and port the following entries have to be made:
-
in
gateway/conf/connections.properties
CLUSTER = https://VsiteHost:VsitePort-
in
unicorex/conf/uas.config
container.sitename=CLUSTER-
in
unicorex/conf/wsrflite.xml
      <property name="container.baseurl"
       value="https://gatewayHost:gatewayPort/CLUSTER/services"/>
      <!-- physical hostname (or IP address) and port -->
      <property name="container.host" value="VsiteHost"/>
<property name="container.port" value="VsitePort"/>-
in
unicorex/conf/uas.config(for using thexuudb)
      container.security.attributes.XUUDB.xuudbHost=https://XuudbHost
      container.security.attributes.XUUDB.xuudbPort=XuudbPort
container.security.attributes.XUUDB.xuudbGCID=CLUSTER-
in
xuudb/conf/xuudb_client.confandxuudb/conf/xuudb_server.conf(for defining thexuudb)
xuudb.address=https://XuudbHost:XuudbPort-
in
<TSI_Name>/conf/tsi.properties
      tsi.njs_machine = VsiteHost
      tsi.njs_port = Port-T_njs
      tsi.my_port = Port-T_in
where Port-T_njs is the port unicorex is listening for connections
from the tsi; Port-T_in is the port tsi is
listening for connections from unicorex.
-
in
unicorex/conf/xnjs_legacy.xml
      <eng:Property name="CLASSICTSI.machine" value="TargetHost"/>
      <eng:Property name="CLASSICTSI.port" value="Port-T_in"/>
      <eng:Property name="CLASSICTSI.replyport" value="Port-T_njs"/>
      <eng:Property name="CLASSICTSI.TSI_LS"
                    value="/opt/unicore/TSI_Name/tsi_ls"/>
      <eng:Property name="CLASSICTSI.TSI_DF"
                    value="/opt/unicore/TSI_Name/tsi_df"/>
3. Operation of a UNICORE Installation
Once the components have been installed and configured they can be started, tested, monitored and stopped.
3.1. Starting
Each of the services has a bin/start.sh script to start it. One exception is the tsi, which is started with bin/start_tsi.
To start all components installed on one machine with just one command use the top-level start.sh. It will start all
components whose directories are present in the installation directory.
3.2. Stopping
Analogously all components can be either stopped by their respective bin/stop.sh command or altogether
by the top-level stop.sh command. The tsi can be stopped with bin/kill_tsi.
3.3. Monitoring
The Gateway, UNICORE/X, Registry and XUUDB servers have a bin/status.sh script which checks whether the processes are running.
The TSI has an analogous bin/find_pids command.
To check whether your services have started properly, check the log/startup.log of each service.
In addition you can inspect the component’s log file, e.g. unicorex/logs/uas.log or /xuudb/logs/server.log,
for more detailed information.
|
Note
|
The Java based servers (i.e. all except the TSI) can be inspected through the standard Java management extensions (JMX),
which allows to check memory usage and other relevant information through a program called "jconsole"
which is part of the Java SDK. If the Java process is running on the same host as the jconsole, no further configuration
is required. To enable remote access via JMX, you’ll have to adapt unicorex/conf/startup.properties
respectively registry/conf/startup.propertes. There, several system properties are defined that enable and
configure remote access via JMX. |
3.4. User Management
To allow users access, they will need to be added to the XUUDB (or any other attribute source that you have configured).
For the XUUDB in our example scenario, assume we want to add a user with xlogin "hpc123"
ssh unicore@unicore.example.org
cd /opt/unicore/unicore7.3.0/xuudb
bin/admin.sh adddn CLUSTER "DN of user" hpc123 user
The parameters to the admin "adddn" command are
-
the GCID (grid component ID) which was chosen as the parameter
uxGCIDinconfigure.properties -
the Distinguished Name taken from the user’s certificate
-
the desired Unix login for the user (which has to exist on the target resource)
-
the role, in this case "user".
|
Note
|
It is not possible to use the Unix login "root", this is forbidden by the TSI for obvious security reasons. |
3.5. Testing your Installation
For testing your installation, the simplest way is to use the UNICORE Command Line Client (ucc). Please refer to the UCC manual for further installation, configuration and usage instructions. For functionality testing you should use a user certificate and try the following command, which lists many of the capabilities of an installation
ucc system-info -lTo further test your installation, try
ucc connect
ucc run -v somejob.u
etc.
|
Note
|
UCC is very powerful if used with a certificate that has role "admin". See the chapter "Admin use of UCC" in the UCC manual. |
4. Integration of Another Target System
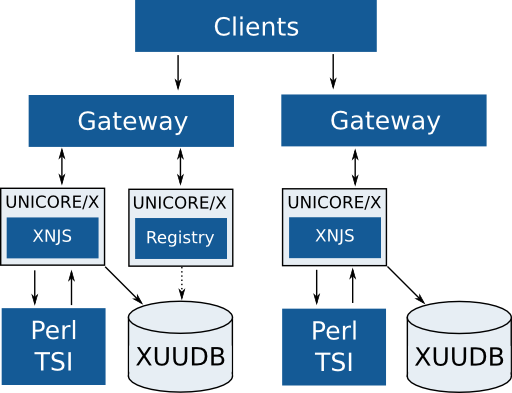
In case there is a second cluster or another compute system, which should be made accessible through UNICORE, it can be included by adding another unicorex service and a tsi. The xuudb, registry and the gateway can be shared as shown in [img-scenario1].
4.1. Configuration of the UNICORE/X Service
The configuration of an additional UNICORE/X service is similar to the first UNICORE/X.
In preparation for it you have to obtain a certificate for this service, a port number, a VSite name, and a GCID
and make a copy of the unicorex directory. Staying with the example configuration used earlier, you now have
on your server unicore2.example.org besides the unicorex directory a directory secondunicorex
secondunicorex/conf/uas.configSome basic settings have to be provided here:
      #
      # VSite name
      #
      container.sitename=CLUSTER2
      ...
      # Grid component ID used when querying XUUDB
      # could be the same as for first unicorex if both sites share the same userids
container.security.attributes.XUUDB.xuudbGCID=CLUSTER2secondunicorex/conf/wsrflite.xmlBesides the security settings (server identity and truststore) the following settings have to be adapted:
      <!-- provide the URL to access the service through the Gateway -->
         <property name="container.baseurl"
             value="https://unicore.example.org:8080/CLUSTER2/services"/>
      <!-- physical hostname (or IP address) and port -->
      <property name="container.host" value="unicore2.example.org"/>
<property name="container.port" value="PORT2"/>secondunicorex/conf/xnjs_legacy.xmlHere basic information on the target system, its features and how to address it are to be specified.
      <!-- properties -->
      ...
        <!-- Directory used for job directories (must be on the TSI machine -->
        <eng:Property name="XNJS.filespace" value="/some/directory/on/the/target/system"/>
      ...
      <eng:Property name="XNJS.tsiclass" value="de.fzj.unicore.xnjs.legacy.LegacyTSI"/>
      <!-- classic TSI properties -->
      <eng:Property name="CLASSICTSI.machine" value="login.cluster2.example.org"/>
      <!-- the port on the TSI machine where the TSI listens -->
      <eng:Property name="CLASSICTSI.port" value="tsiPort"/>
      <!-- the port on the XNJS machine which the TSI talks to -->
      <eng:Property name="CLASSICTSI.replyport" value="tsiNjsPort"/>
      <!-- a user who may see all the jobs on the batch system (can not be 'root'!) -->
      <eng:Property name="CLASSICTSI.priveduser" value="unicore"/>
      ...
      <!-- various command locations (on the TSI machine) -->
... <!-- adapt paths to commands etc. here -->secondunicorex/conf/simpleidbHere available resources, applications, and environments on the target system have to be specified. More detailed information is provided in the IDB documentation.
4.2. Configuration of Target System Interface
The TSI has to be installed and configured as described for the initial TSI above.
4.3. Addition of Users to the XUUDB
In case the user IDs on the new site (CLUSTER2) are different from the user IDs
on CLUSTER, the users have to be added to the XUUDB with gcid CLUSTER2.
4.4. Additions to the Gateway
In the current example the Gateway’s auto-registration-option is not enabled therefore the new unicorex site
has to be added to gateway/conf/connections.properties:
CLUSTER2 = https://unicore2.example.org:PORT25. Multi-Site Installation Options
By multi-site installation we mean that multiple UNICORE installations are working together, and users may use resources from more than one site --- the very basic idea of a Grid.
In fact there is nothing new in such a setting. Of course, the sites need to trust each other, so the CAs that issued the certificates of the gateways and servers needs to be trusted by the other sites. Some services in such a multi-site Grid are shared, most notably one would need a shared registry, and workflow services should be able to access all the execution sites.
5.1. Multiple Registries
For redundancy, multiple Registry servers may be present in a UNICORE Grid. Users can then choose to connect to one or more of these.
On the server side, each UNICORE/X server can register with more than one registry.
This is done in the unicorex/conf/uas.config file
#
# URLs of registries to register with
#
# the one at our site
container.externalregistry.url=https://unicore.example.org:8080/REGISTRY/services/Registry?res=default_registry
# another one
container.externalregistry.url.2=https://othersite.org:8080/OTHER-REGISTRY/services/Registry?res=default_registry
# more are possible...
# container.externaregistry.url.3=...
6. Setting up the Workflow Services
For the execution of workflows the UNICORE installation needs to have the workflow services
set up. The unicore-workflow-7.0.0.tgz consists of workflow
and servorch service. It can be downloaded from
SourceForge.
There are two servers that make up the workflow system
-
the Workflow engine offers workflow submission and management services to clients. It deals with the high-level workflow execution, processing of control structures, conditions etc. It creates work assignments corresponding to single UNICORE jobs which are submitted to a Service orchestrator service
-
the Service Orchestrator (Servorch for short) deals with individual work assignments from the Workflow engine. It brokers the available UNICORE resources and finds sites matching the job requirements. The job is submitted and monitored until it has finished execution. Since these tasks are fairly resource-intensive, multiple Servorch servers may be present in the Grid to share the load.
6.1. Preparation
The workflow server components are the Workflow and Servorch (short for Service Orchestrator) servers, which are
contained in the release bundle unicore-workflow-7.0.0.tgz.
The installation procedure is very similar to the core servers. Indeed both Workflow and Servorch servers share a lot of their configuration with the UNICORE/X, since they are "just" special purpose UNICORE/X servers.
If you haven’t already done so, download the .tgz file, and untar it into a
directory such as /opt/unicore-workflow.
In addition you should have a gateway installed to protect the services and an xuudb for authorizing users to use the workflow services. In the UNICORE Grid, there should be at least one UNICORE/X server which offers a storage factory service. This is needed for handling of workflow data.
You have several options to configure the components:
-
(recommended) You may use the
configure.propertiesfile and set up the local configuration parameters there before you run theconfigure.pyscript. -
You may go through the configuration files and adapt them to your local setup, e.g. hostnames and ports, local paths etc. which should be straight forward. Specific configuration options are covered in the next chapters.
We prefer the first approach, since it will give you a working configuration, which you then can customise later.
So here is the recommended procedure
-
Edit the
configure.propertiesfile, and customize it according to your deployment plan -
Configure and install workflow and servorch using
configure.pyandinstall.py -
Start the servers
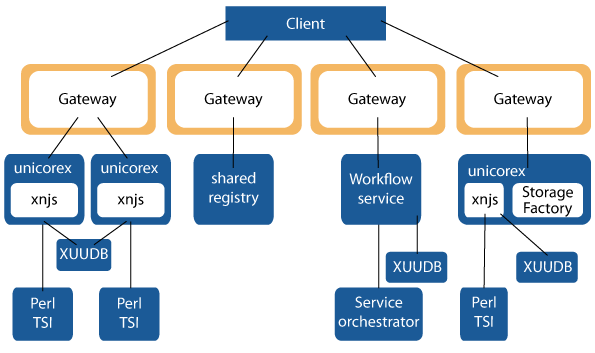
In the following the necessary steps are detailed. We are targeting a Grid layout as shown in [img-workflow-layout]. The Workflow server uses one or multiple Service Orchestrator services to take care of job brokering and execution. A shared registry is used: on the one hand for registering the workflow services, so users can find and use them, on the other hand for finding target systems for running jobs. An XUUDB controls which users have access to the workflow services.
# which components to install

workflow=true
servorch=true

# Java command
JAVA_CMD=java

#
# base directory, use "currentdir" to leave as-is
# (otherwise use an absolute path, such as "/opt/unicore-workflow")
#
INSTALL_PATH=currentdir

#
# Gateway host and port
#
gwHost=unicore.example.org
gwPort=8080

#
# enable auto-registration of the servers with the gateway?
#
gwAutoRegistration=false

#
# WORKFLOW server
#

#server host
wfHost=workflow.example.org

#server port
wfPort=7700

#workflow vsite name
wfSitename=WORKFLOW

# Port used by JMX
wfJmxPort1=9100

# Use XUUDB? Or set to "FILE" for simple map file
wfUseXUUDB=XUUDB


#
# SERVORCH server
#

#server host
soHost=workflow.example.org

#server port
soPort=7701

#servorch vsite name
soSitename=SERVORCH

# Port used by JMX
soJmxPort2=9101

# Use XUUDB? Or set to "FILE" for simple map file
soUseXUUDB=XUUDB

#
# settings for defining the external registry
#

#use external Registry?
useExternalRegistry=true
#either give fixed URL
urlExternalRegistry=https://unicore.example.org:8080/UNICORE/services/Registry?res=default_registry
#optionally, auto-discover?
findExternalRegistry=false

#
# XUUDB settings
#

# XUUDB server host
xuudbHost=unicore.example.host

# XUUDB server port
xuudbPort=34463

# Grid component ID to use
xuudbGCID=WORKFLOW
Copy your configure.properties somewhere safe, e.g. to your home
directory, for later use and reference.
Now you’re ready to configure the components using configure.py. This will insert
your configuration values into the relevant files.
6.2. Workflow
The workflow service’s configuration is contained in workflow/conf/uas.config
and workflow/conf/wsrflite.xml.
The main settings have already been done through the configure.py. The only thing left is
the definition of security credential and truststore, which is done in wsrflite.xml.
   ...
   <!-- security configuration -->

   <property value="true" name="container.security.sslEnabled"/>
   <property value="true" name="container.httpServer.requireClientAuthn"/>

   <property value="/path/to/your/workflow/keystore.p12" name="container.security.credential.path"/>
   <property value="<keystore password>" name="container.security.credential.password"/>
   <property value="pkcs12" name="container.security.credential.format"/>

   <property value="keystore" name="container.security.truststore.type"/>
   <property value="/path/to/your/workflow/truststore.jks" name="container.security.truststore.keystorePath"/>
   <property value="<truststore password>" name="container.security.truststore.keystorePassword"/>
   <property value="jks" name="container.security.truststore.keystoreFormat"/>
6.3. Service Orchestrator
For the service orchestrator there is also just the definition of the security credentials and the truststore left.
These have to be set in servorch/conf/wsrflite.xml.
   <!-- security configuration  -->

  <property value="true" name="container.security.sslEnabled"/>
  <property value="true" name="container.httpServer.requireClientAuthn"/>

  <property value="/path/to/your/servorch/keystore.p12" name="container.security.credential.path"/>
  <property value="<keystore password>" name="container.security.credential.password"/>
  <property value="pkcs12" name="container.security.credential.format"/>

  <property value="keystore" name="container.security.truststore.type"/>
  <property value="/path/to/your/servorch/truststore.jks" name="container.security.truststore.keystorePath"/>
  <property value="<truststore password" name="container.security.truststore.keystorePassword"/>
  <property value="jks" name="container.security.truststore.keystoreFormat"/>
6.4. Configuration changes to other components
6.4.1. Gateway
Edit gateway/conf/connections.properties and add the entries for the workflow servers:
   WORKFLOW = https://workflow.example.org:7700
   SERVORCH = https://workflow.example.org:7701
WORKFLOW and SERVORCH are the VSite names you defined in configure.properties or the
services uas.config for attribute container.sitename.
6.4.2. XUUDB
It is assumed that you have an XUUDB up and running. Then you have to add all users who are allowed to use the workflow service to the database
with the GCID WORKFLOW defined in the configure.properties file as shown above. The value can also be found in the uas.config file.
6.4.3. Adding a Storage Factory to a UNICORE/X Server
At least one UNICORE/X server in the UNICORE Grid needs to provide filespace
for workflow execution. On that UNICORE/X server, the StorageFactory service needs to
be configured in uas.config and wsrflite.xml.
For better load and data distribution multiple storage factories may be available.
#################################################
### StorageFactory service configuration ########
#################################################

#
# Available storage types
#
coreServices.sms.factory.enabledTypes=DEFAULT

#
# Configuration for the "DEFAULT" storage type
#
coreServices.sms.factory.DEFAULT.description=Default filesystem

# Base path. Denotes an absolute path on the TSI machine / cluster filesystem
# Must be world writable (chmod 1777)
coreServices.sms.factory.DEFAULT.path=/path/to/storagefactorybase

# If this is set to true, the directory corresponding to a storage instance will
# be deleted when the instance is destroyed.
# Defaults to "true"
coreServices.sms.factory.DEFAULT.cleanup=true

# this can be used to override the general list of SMS filetransfer protocols
coreServices.sms.factory.DEFAULT.protocols=BFT RBYTEIO SBYTEIOThe storage factory service must be defined and enabled in the service section of the file.
    <!-- the storage factory service -->
   <service name="StorageFactory" wsrf="true" persistent="true" enabled="true">
     <interface class="de.fzj.unicore.uas.StorageFactory" />
     <implementation class="de.fzj.unicore.uas.impl.sms.StorageFactoryHomeImpl"/>
   </service>
After enabling, the "ucc system-info -l" must show the new storage factory service.
7. Installation Variations
7.1. Data Transfer with UFTP
The UNICORE file transfer protocol (UFTP) combines high performance with firewall friendly configuration.
Data connections are dynamically allocated and managed. UFTP can be used as an alternative to the default BFT
(Baseline File Transfer, a fast https-based protocol) file transfer mechanism used in UNICORE. If you want to
use UFTP you have to install the uftp daemon on each target system (i.e. on the login node of a cluster).
Installation and configuration is described in the uftpd manual.
For its integration into UNICORE adapt the configuration of the UNICORE/X service in conf/wsrflite.xml:
<!-- UFTP filetransfer (requires a UFTP server as well!) -->
<service name="FileTransferUFTP" wsrf="true" persistent="true">
  <interface class="de.fzj.unicore.uas.fts.FileTransfer" />
  <implementation class="de.fzj.unicore.uas.fts.FileTransferHomeImpl"/>
</service>
In conf/uas.config uftp has to be added to the list of supported protocols for each storage where you want UFTP enabled, for example:
# supported protocols
coreServices.sms.protocols=BFT UFTP RBYTEIO SBYTEIO
coreServices.sms.factory.TYPE1.protocols=UFTP BFT
coreServices.targetsystem.storage.N.protocols=UFTP BFT
The sequence of the listed protocols is the sequence of preference.
Furthermore, the services needs to know the UFTPD server settings, which are also defined in conf/uas.config:
# REQUIRED parameters
# Listener (pseudo-FTP) socket
coreServices.uftp.server.host=login.cluster.example.org
coreServices.uftp.server.port=64434
# Command socket
coreServices.uftp.command.host=login.cluster.example.org
coreServices.uftp.command.port=64435

# Full path to the 'uftp.sh' client executable on the TSI login node
coreServices.uftp.client.executable=/path/to/your/uftpd-install-dir/bin/uftp.sh
#
# Optional parameters
# How many parallel streams to use per file transfer
coreServices.uftp.streams=2
# Limit the maximum number of streams per file transfer
coreServices.uftp.streamsLimit=4
# File read/write buffer in kbytes
coreServices.uftp.buffersize=128
Also, you have to adapt the servorch/conf/uas.config file, if you want to use uftp for transfers in workflow:
# Preferred filetransfer protocol
# (default: BFT)
servorch.outcomesProtocol=UFTP
7.2. SSL Connection Between UNICORE/X and TSI
By default the connection between unicorex and tsi is not using SSL as it is assumed that the systems the services are running on are firewall protected within one domain, also the server unicorex is running on shouldn’t allow any user logins. In different set ups the connection between unicore/x and tsi has to be secured by SSL. This is described at http://unicore.eu/documentation/manuals/unicore/files/tsi/tsi-manual.html#tsi_ssl
7.3. Add Applications to a Vsite Definition
Applications defined in UNICOREX’s conf/simpleidb can easily be used in jobs without e.g. knowing the execution path.
How to configure applications is described at http://unicore.eu/documentation/manuals/unicore/files/unicorex/unicorex-manual.html#_applications
The UNICORE Rich Client offers a configured application in the selection list of the generic job.
7.4. User Authentication with Unity
Unity (http://www.unity-idm.eu) is an identity management system which can be used for a variety of tasks, e.g. as authentication service using a federation of identity providers. Description of some scenarios how Unity can be used together with UNICORE are given at http://sourceforge.net/p/unicore/wiki/UNICORE%20and%20Unity/
7.5. UserId Mapping
There are alternatives to using the XUUDB service for Userid mapping: You can choose to use a flat file or an
external identity provider or a combination of the three. The related configuration options in unicorex’s conf/uas.config are
container.security.attributes.order,
container.security.attributes.combiningPolicy, and
container.security.attributes.XUUDB.*,
container.security.attributes.VO-P*, and/or
container.security.attributes.FILE.*7.6. Centralized Logging
This can, for example, be realized through using logstash (accepts incoming syslog messages), elasticsearch (stores the logstash output), and kibana (provides user interface to elasticsearch) daemons (https://www.elastic.co/). The logging of UNICORE services is configured in conf/logging.properties:
log4j.rootLogger=INFO,A1,LOGSTASH
log4j.appender.LOGSTASH=org.apache.log4j.net.SocketAppender
log4j.appender.LOGSTASH.port=<logstash-port>
log4j.appender.LOGSTASH.remoteHost=<logstash-ip-address>
7.7. Monitoring
A common tool for infrastructure monitoring is Nagios (http://www.nagios.org). Probes for the UNICORE services have been developed within the EU-funded EMI project (http://www.eu-emi.eu): http://unicore-dev.zam.kfa-juelich.de/documentation/nagios-probes-2.3.2/manual.pdf provides the details.
7.8. High-availabilty configuration for TSIs
If you want to run TSIs on several login nodes of a cluster you have to configure them in UNICORE/X’s conf/xnjs_legacy.xml
using the CLASSICTISI.machine property. It is a comma separated list of machines names or IP addresses.
Optionally, a port number can be added to each entry, separated from the machine by a colon. The XNJS will establish
connections to three of these machines and ports to ensure that jobs can be submitted and job
statuses retrieved even if one of the TSI instances is unavailable. In case all three previously connected TSIs are down the
unicorex will connect to the next group of three TSIs, if available. Should the port not be given along with the machine,
CLASSICTSI.port will be used as a default.
<eng:Property name="CLASSICTSI.machine" value="<machine_1>:<tsi_port_1>,<machine_2>:<tsi_port_2>,<machine_3>:<tsi_port_3>, ..."/>
<eng:Property name="CLASSICTSI.port" value="4433"/>
In case your login nodes use shared file systems you have to modify the bin/start_tsi script of the TSI installation to make sure that
each TSI instance gets its separate PID_FILE file at start-up as well as its separate log file, for example:
PID_FILE=$TSI_CONF/LAST_TSI_PIDS_`hostname -s`
tsilog=$LOG_DIR/TSILog_`hostname -s`${date}${time}
8. Contact
In case of problems with UNICORE installation and configuration please contact unicore-support@lists.sourceforge.net
9. Glossary
|
VSite
|
A VSite (= virtual site) is the UNICORE term for a Grid node, such as a compute resource. It corresponds to a UNICORE/X server. |
|
XUUDB
|
The UNICORE user database maps a user certificate to attributes such as the user account and the user role. These attributes are used to control access to UNICORE resources. |
|
UNICORE/X
|
UNICORE/X is the central server component. It offers Web Services, interfaces to the XUUDB or other attribute sources, and provides access control. Using the XNJS library, it executes and manages jobs. Jobs are passed to the TSI for execution. |
|
XNJS
|
an internal library providing the functionality underlying many of the Web Service interfaces of UNICORE. For example, the interface to the TSI or the file staging capabilities are provided through the XNJS. The XNJS is also used in the Workflow engine for handling workflows. |
|
UAS
|
the set of basic UNICORE Web Service interfaces (TargetSystemFactory, StorageManagement, etc) are sometimes referred to as UNICORE Atomic Services. |
|
IDB
|
The IDB is a file which describes system specific values like paths to executables, amount of physical memory and CPUs, etc. It is used by UNICORE/X to translate an abstract job into a system specific job. |
|
Global Registry
|
The Global Registry is used by clients (and services) to find available services in a UNICORE Grid. UNICORE/X servers register services with one or more Global Registries. |
|
Gateway
|
A site’s Gateway to the public network. It is designed to be the only component which has an open port in the firewall, and it can serve multiple UNICORE components within the same firewall. |
|
TSI
|
The Target System Interface executes a system specific job on the target system on behalf of a user. It communicates with the local resource management system and allows access to the local filesystems. |
|
GCID
|
Used to differentiate different sets of entries in the XUUDB. Thus it is possible to share a XUUDB between several servers where each server uses a different GCID. To share XUUDB entries between multiple servers, give these components the same GCID. |
|
OGSA
|
The Open Grid Services Architecture |
|
OGSA-BES
|
OGSA Basic Execution Service |
|
JSDL
|
Job Submission Description Language |
|
URI
|
Uniform Resource Identifier |
|
HTTP
|
Hypertext transfer protocol |
|
XML
|
eXtensible Markup Language |
|
SSL
|
Secure Socket Layer |
|
CA
|
Certification Authority |
|
UFTP
|
UNICORE File Transfer Protocol |
|
BFT
|
Baseline File Transfer |